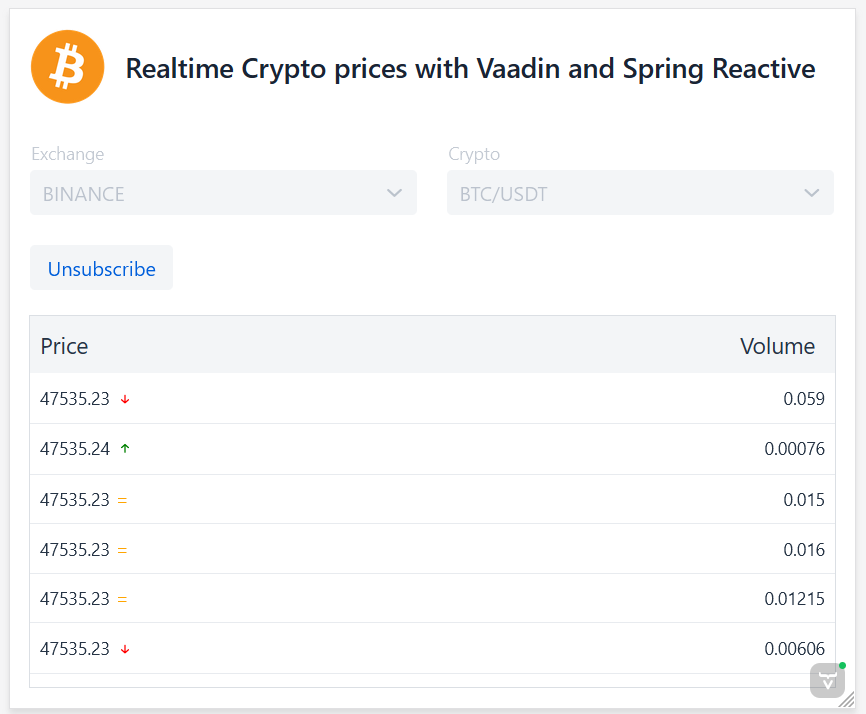
In this article, we’re going to create a simple application to display crypto currencies trades price in realtime using Vaadin Flow and Spring Reactive WebSockets API.
The WebSocket protocol (RFC 6455) provides a standardized way to establish a full-duplex, two-way communication channel between client and server over a single TCP connection. For this application, we are going to use Finnhub WebSockets API as it has a free tier that streams realtime trades for US stocks, forex and crypto.
The frontend choice is Vaadin Flow, version 23.0.1 at the time of writing, as it provides a simple, fast and powerful way to build UIs. Vaadin also supports server push over WebSockets, exactly what we need for displaying prices in realtime without the user explicitly requesting for updates.
Communication with prices WebSocket API will be performed using the fully non-blocking Spring Reactive WebClient. It has a functional, fluent API based on Reactor, which enables declarative composition of asynchronous logic without the need to deal with threads or concurrency. You can find a more detailed introduction about Reactive programming on Spring Reactive and Reactive Streams.
Is not the purpose of this article to deep dive into Spring Reactive and WebSocket specification. If you are interested in learning more about them, please refer to their corresponding documentation.
Show me the code
Let’s get straight into our tutorial and code.
The application stack is based on Maven 3.2+, Java 11+, Vaadin Flow 23, Spring Framework 5 and Spring Boot 2.6. You also need to have Lombok setup on your IDE.
WebSocket and Reactive configuration in Spring
Take a look at the most important blocks of the configuration in AppConfiguration class.
Define a WebSocketClient bean based on ReactorNettyWebSocketClient implementation.
    @Bean
    WebSocketClient webSocketClient() {
        return new ReactorNettyWebSocketClient();
    }
We also need a WebClient bean for fetching the list of available Exchanges and CryptoCurrencies from a REST API.
    @Bean
    WebClient finnhubWebClient(@Value("${api.finnhub.base.endpoint}") String baseUrl,
            @Value("${api.finnhub.token}") String token,
            WebClient.Builder webClientBuilder) {
        return webClientBuilder.baseUrl(baseUrl)
                .defaultHeader("X-Finnhub-Token", token)
                .build();
    }
Then define the reactive Sink and Flux beans needed for handling the WebSocket session. It’s really important to set autoCancel=false when creating priceSink in order to avoid Sink completion when last subscriber cancels.
@Bean
Many requestSink() {
    return Sinks.many().multicast().onBackpressureBuffer(Queues.SMALL_BUFFER_SIZE, false);
}

@Bean
Flux requestFlux() {
    return requestSink().asFlux();
}

@Bean
Many priceSink() {
    // set autoCancel=false to avoid Sink completion when last subscriber cancels
    return Sinks.many().multicast().onBackpressureBuffer(Queues.SMALL_BUFFER_SIZE, false);
}

@Bean
Flux priceFlux() {
    return priceSink().asFlux();
}
WebSocket session handler and API interaction
Let’s jump to the backend service that consumes the WebSocket API using the reactive WebClient API. This service class implements WebSocketHandler interface. Its handle method takes WebSocketSession and returns Mono<Void> to indicate when application handling of the session is complete. The session is handled through two streams, one for inbound and one for outbound messages.
First of all, open the WebSocket session after bean construction.
    @PostConstruct
    void init() {
        // open websocket session
        webServiceSubscription = webSocketClient.execute(URI.create(webserviceEnpoint), this).subscribe();
    }
The service implements handle() method that receives the WebSocket session as a parameter. Received messages are sent to priceSink and requests are consumed from requestFlux.
@Override
public Mono handle(WebSocketSession session) {
    session.receive()
            .map(WebSocketMessage::getPayloadAsText)
            .log()
            .map(this::map)
            .filter(tradeResponse -> Types.TRADE.getType().equals(tradeResponse.getType()))
            .map(TradeResponse::getTrades)
            .filter(Objects::nonNull)
            .flatMap(trades -> Flux.fromStream(trades.stream()))
            .subscribe(priceSink::tryEmitNext);

    return session.send(requestFlux.map(this::map).map(session::textMessage))
            .then();
}
Client subscription to reactive flux
In order to start receiving prices data, clients must subscribe to priceFlux. Furthermore, if this is the first subscriber for a given symbol, requestSink must emit a new request. WebSocket handler will consume it and send a subscribe message to the API. All this logic is implemented on PriceFluxSubscriptionContext.subscribe() method.
    public SubscriptionResult subscribe(String symbol, CryptoPricesSubscriber subscriber) {
        var symbolSubscribers = subscribers.computeIfAbsent(symbol, key -> new CopyOnWriteArrayList());
        symbolSubscribers.add(subscriber);

        var emitResult = EmitResult.OK;

        if (symbolSubscribers.size() == 1) {
            // emit request only if this is the first subscriber
            emitResult = requestSink.tryEmitNext(SymbolRequest.subscribe(symbol));
        }

        if (emitResult.isSuccess()) {
            subscriber.subscribe(priceFlux, symbol);
            return SubscriptionResult.ok();
        }

        return SubscriptionResult.error();
    }
Invoking PriceFluxSubscriptionContext.unsubscribe() method removes the client subscription. If there’s no more subscribers for a symbol, requestSink emits an unsubscribe request so the WebSocket API aborts sending prices for that symbol.
public void unsubscribe(String symbol, CryptoPricesSubscriber subscriber) {
    var symbolSubscribers = subscribers.get(symbol);

    if (symbolSubscribers != null) {
        symbolSubscribers.remove(subscriber);
        if (symbolSubscribers.isEmpty()) {
            // emit an unsubscribe request if symbol has no more subscribers
            requestSink.tryEmitNext(SymbolRequest.unsubscribe(symbol));
        }
    }

}
Frontend setup and view
Finally, let’s take a look at frontend code and how the view in order to display cryptocurrencies prices in realtime.
First of all, enable Vaadin server push support in our application by adding @Push annotation.
...
@Push
public class ReactiveCryptoApplication extends SpringBootServletInitializer implements AppShellConfigurator {
   ...
}
TradesListView class implements CryptoPricesSubscriber interface, whose methods subscribe and unsubscribe allow the interaction with PriceFluxSubscriptionContext.
Clicking Subscribe button kicks off the subscription.
    subscribeButton.addClickListener(e -> {
        ...
        var result = subscriptionContext.subscribe(getSymbol(), this);
        ...
    });
Then PriceFluxSubscriptionContext invokes subscribe() method from client. The latter subscribes to priceFlux in order to start consuming elements from this flux and display prices as the arrive. Note that UI updating logic is executed inside UI.access() method. The reason is that user session requires locking when making changes to a UI from another thread and pushing them to the browser.
@Override
public void subscribe(Flux cryptoPrices, String symbol) {
        progressBar.setVisible(true);
        subscribeButton.setVisible(false);
        unsubscribeButton.setVisible(true);
        exchangesComboBox.setEnabled(false);
        symbolsComboBox.setEnabled(false);

        var priceSubscription = priceFlux.subscribe(trade -> getUI().ifPresent(ui -> ui.access(() -> {
            if (trade.getSymbol().equals(symbol)) {
                progressBar.setVisible(false);
                tradesPanel.add(trade);
            }
        })));

        // keep for later unsubscription
        priceSubscriptionMaybe = Optional.of(priceSubscription);
}
Clicking Unsubscribe button stops the interaction between client and backend.
unsubscribeButton.addClickListener(e -> subscriptionContext.unsubscribe(getSymbol(), this));
Running the application
First, you’re going to need a free account at https://finnhub.io in order the get access to their API and get the authetication token.
Then, open application.properties file and replace your_token string with the corresponding token you obtained.
api.finnhub.endpoint=wss://ws.finnhub.io?token=your_token
api.finnhub.token=your_token
You can run the application from the command line with Maven by running.
mvnw spring-boot:run
Now open localhost:8080 on your browser and you should see the application page.

Summary
We’ve presented a simple example on how to consume and interact with a WebSocket in a reactive way. Support provided by Spring Framework and Project Reactor makes this task a bit simpler. And thanks to Vaadin push support, we were able to push price data to UI without any further interaction required from user’s side.
As always, the full example can be found in our GitHub repository, and an online demo here.


Join the conversation!
Hello,
I wanted to get the project up and running on my side but I keep getting errors in the promise package. I have updated the packages many times.
Can you help me
Hi Kadir.
I’ve created an issue in the github project page: https://github.com/FlowingCode/reactive-crypto/issues/3
Can you post the stacktrace of the exception in there?
Regards